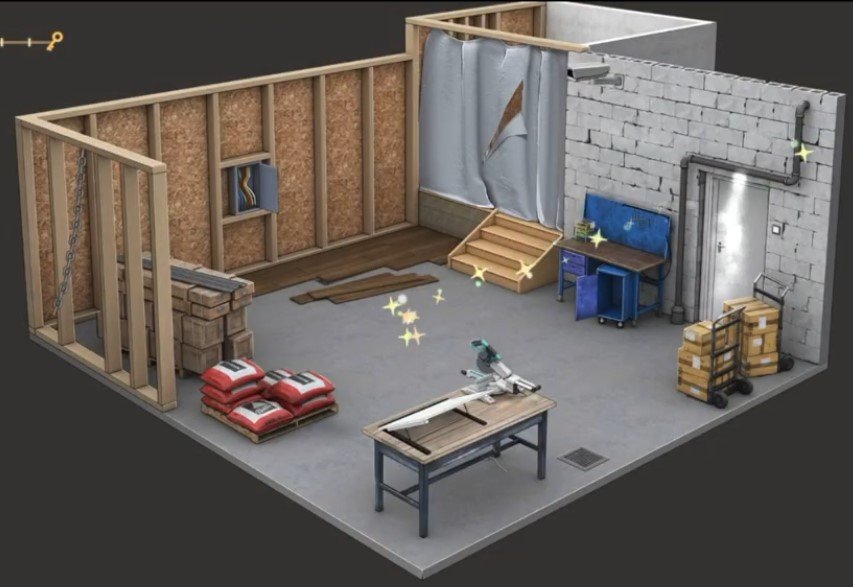
Here you will get solutions and step by step guide for Rooms & Exits Chapter 2 Level 11. In this puzzle developed by Webelinx Games. Every clue tells a story, and every puzzle brings you closer to the truth. Join Fiona, a brave journalist with a sharp eye for hidden secrets, as she investigates mysterious cases filled with unexpected surprises. This level belongs to the No Honor Among Thieves category and is the DIY Shop level.
Search for clues, solve challenging puzzles, and uncover the secrets hidden in every location. Each level offers a fresh mystery that will test your observation skills and logical thinking. Whether you enjoy detective stories, escape room challenges, or brain-teasing adventures, this game delivers an exciting experience from start to finish.

Rooms & Exits DIY Shop – Chapter 2 Level 11 Solution
The following guide explains how to solve Rooms and Exits DIY Shop step by step.
If you get stuck at any point, leave a comment below. Our team will be happy to help you find the solution.
Phase 1: Restore Power & Open the Safe
Restore the Workshop Power
- Step 1: Collect the Gloves from the wooden beams on the left.
- Step 2: Use the Gloves to reconnect the exposed electrical wires.
- Step 3: Flip the wall switch to restore power.
Collect the Required Tools
- Step 4: Look under the workbench and collect the Hanger.
- Step 5: Go to the office desk.
- Step 6: Collect the Box Cutter.
- Step 7: Open the lower cabinet and collect the UV Lamp.
Open the Blue Cabinet
- Step 8: Use the Box Cutter to cut the hanging drapes.
- Step 9: Reveal the hidden blue drawer cabinet.
- Step 10: Read the note on the desk for the clue.
- Step 11: Press the buttons in this order:
- 5 → 1 → 4 → 3 → 2
- Step 12: Open the drawer and collect the Hammer.
Unlock the Hidden Safe
- Step 13: Shine the UV Lamp on the blue board above the desk.
- Step 14: Note the hidden code 42130.
- Step 15: Use the Hammer to break the weak wall.
- Step 16: Open the hidden wall safe.
- Step 17: Enter the code 42130.
- Step 18: Collect the Blowtorch Part.
Phase 2: Assemble the Blowtorch & Enter Room 2
Build the Blowtorch
- Step 1: Find the second Blowtorch Part behind the desk.
- Step 2: Use the Box Cutter to open the shipping boxes.
- Step 3: Collect the Lighter.
- Step 4: Combine both Blowtorch Parts.
- Step 5: Attach the Lighter to create the Lit Blowtorch.
Find the Keys
- Step 6: Use the Lit Blowtorch to cut open the welded floor hatch.
- Step 7: Dismantle the Hanger to create a Hook.
- Step 8: Use the Hook to pull out the Small Key.
- Step 9: Unlock the blue chest using the Small Key.
- Step 10: Collect the Inner Key.
- Step 11: Collect the Blueprint.
- Step 12: Use the Inner Key to unlock the side door and enter the second room.
Phase 3: Solve the Blueprint Puzzle & Escape
Repair the Ladder
- Step 1: Collect the Ladder near the entrance.
- Step 2: Pick up the Batten beside the paint cans.
- Step 3: Use the Lit Blowtorch to shape the Batten.
- Step 4: Combine the Batten with the Ladder to repair it.
- Step 5: Place the repaired ladder against the shelves.
- Step 6: Climb up and collect the second Blueprint.
Find the Final Code
- Step 7: Dismantle both Blueprints.
- Step 8: Align the transparent sheets until they reveal the letters GDC.
- Step 9: Use the code GDC to unlock the red toolbox.
- Step 10: Collect the Crowbar.
- Step 11: Return to the first room.
- Step 12: Use the Crowbar to lift the loose floorboard.
- Step 13: Collect the Tracing Paper and note the code 954.
Escape the Workshop
- Step 14: Go to the electrical control panel.
- Step 15: Enter the code 954.
- Step 16: Set the valve directions to Left → Right → Bottom.
- Step 17: Disable the workshop security system.
- Step 18: Open the workshop exit door and escape to complete Level 11.
Video Walkthrough
Congratulations on completing Chapter 2 – Level 11! Click here to unlock Chapter 2 – Level 12.