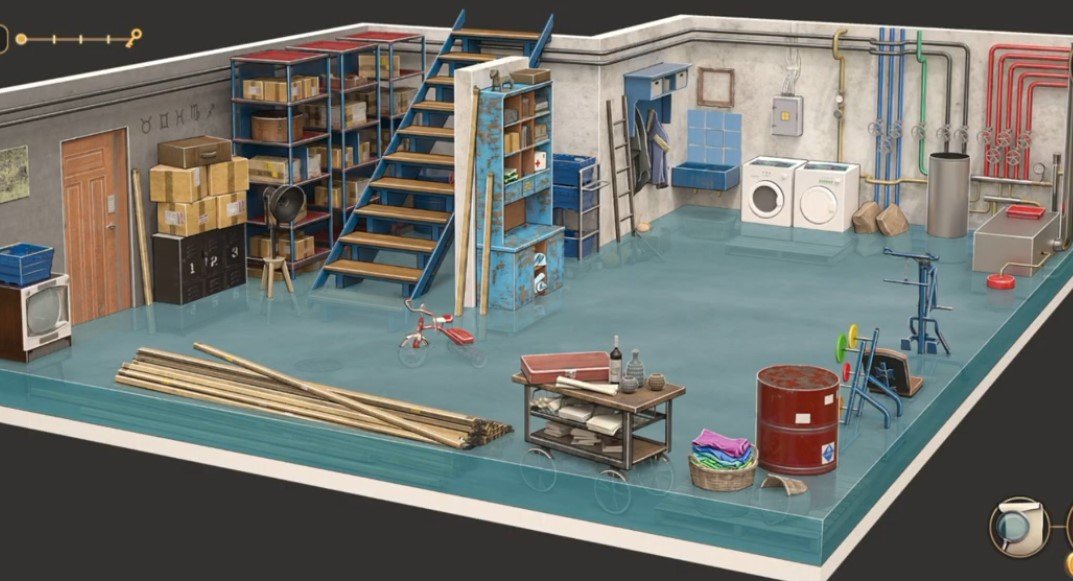
Here you will get solutions and step by step guide for Rooms & Exits Chapter 3 Level 18. In this puzzle developed by Webelinx Games. Every clue tells a story, and every puzzle brings you closer to the truth. Join Fiona, a brave journalist with a sharp eye for hidden secrets, as she investigates mysterious cases filled with unexpected surprises. This level belongs to the Murder Dressed in White category and is the Basement level.
Search for clues, solve challenging puzzles, and uncover the secrets hidden in every location. Each level offers a fresh mystery that will test your observation skills and logical thinking. Whether you enjoy detective stories, escape room challenges, or brain-teasing adventures, this game delivers an exciting experience from start to finish.

Rooms & Exits Basement – Chapter 3 Level 18 Solution
The following guide explains how to solve Rooms and Exits Basement step by step.
If you get stuck at any point, leave a comment below. Our team will be happy to help you find the solution.
Phase 1: Draining the Room and Collecting Tools
- Step 1: Go to the stairs.
- Pull up the loose wooden plank and take the cloth.
- Step 2: Dismantle the cloth in your inventory.
- Take the red switch.
- Step 3: Place the red switch on the panel beside the stairs.
- The water drains away.
- Step 4: Check the clothes basket.
- Take the dirty clothes.
- Step 5: Open the middle section of the blue cabinet.
- Take the pipe wrench.
- Step 6: Open the top section of the blue cabinet.
- Take the round box and rectangle box.
- Step 7: Dismantle both boxes.
- Collect the colored ring plates.
Phase 2: Unlocking the Drawer and Getting the Keys
- Step 8: Look at the clothes hanger near the sink.
- Note the V-shaped pattern.
- Step 9: Tap the mirror above the sink.
- Press the matching tiles to solve the puzzle.
- Step 10: The secret drawer opens.
- Take the locker key.
- Step 11: Go to the pipe panel above the blue bucket.
- Use the pipe wrench to open it.
- Step 12: Take the plunger.
- Step 13: Use the plunger on the clogged sink.
- Step 14: Clean the sink with the cloth.
- Step 15: Solve the ball maze puzzle.
- Step 16: Take the small silver key.
- Step 17: Use the silver key to open the red suitcase.
- Step 18: Take the green weight disc.
Phase 3: Final Puzzle and Escape
- Step 19: Check the pipes behind the dryer.
- Take the socket wrench.
- Step 20: Count the pipe markings:
- Blue = 3
- Green = 1
- Grey = 2
- Red = 5
- Step 21: Turn each valve the correct number of times.
- Step 22: The pressure code is 1200.
- Step 23: Open Locker 2 with the locker key.
- Step 24: Enter the code 1200.
- Step 25: Take the magnifying glass and matchbox.
- Step 26: Use the magnifying glass and matches to reveal the hidden symbol clue.
- Step 27: Solve the breaker board puzzle above the washing machine.
- Step 28: Put the dirty clothes into the washing machine and start it.
- Step 29: Collect the blue weight disc.
- Step 30: Go to the weight bench.
- Step 31: Place both weight discs and balance the colored plates correctly.
- Step 32: Take the zodiac coordinate sheet.
- Step 33: Check the zodiac symbols beside the exit door.
- Step 34: Use the coordinate sheet to find the final code: 43578.
- Step 35: Enter 43578 on the exit door keypad.
- Step 36: Open the door to complete the level.
Video Walkthrough
Congratulations on completing Chapter 3 – Level 18! Click here to unlock Chapter 3 – Level 19.